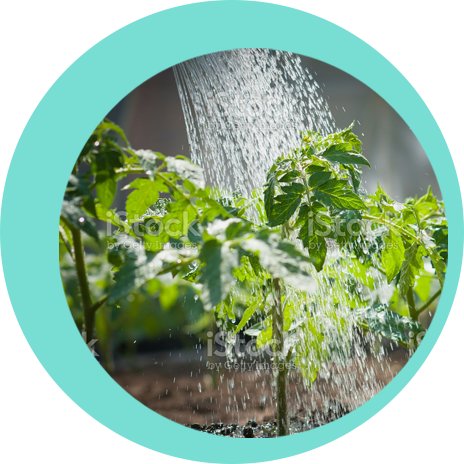
Saving Water Outdoors
Plant Watering Guide
This guide is designed for conditions in the Phoenix metro area and should also work well for other low desert regions of Arizona. If you live in other regions, contact your local water conservation department for assistance.
There are a number of ways to save water in your landscape, and there are some very good reasons to do so. Over half of the water we use at home is used outdoors, which makes watering efficiently one of the best and easiest ways to save water. Proper watering will also keep your landscape plants healthy and beautiful throughout the year.
How Much Water Do Your Plants Need?
Depending on the size and type of the plant (tree, shrub, or groundcover), you will need to water to different depths and widths. A large tree needs more water than a small ground cover because it has a larger root zone – the area in which the plant’s feeder roots are concentrated. Your plants will be healthiest if you completely wet the root zone each time you water.

The 1-2-3 Rule is an Easy Way to Remember How Deep to Water
- Water small plants such as ground covers, cacti, and annuals to a depth of 1 foot. (Grass should be watered to a depth of 10 inches.)
- Water medium plants such as shrubs to a depth of 2 feet.
- Water large plants such as trees to a depth of 3 feet.


Test How Much You’ve Watered
A good way to test how deep you have watered is to use a soil probe – a sharpened piece of rebar or a very long screwdriver works well.
About an hour after watering, push the probe into the soil. It will slide easily through wet soil but will be difficult or impossible to push through dry soil. Water your plants and lawn until you can easily probe to the recommended depth.
How Wide Should You Water?
After plants are established, most water absorbing roots are located near the dripline which is beneath the outer edge of the plant’s canopy – not close to the trunk or stem.
Concentrate your emitters along the dripline of each plant. The water will spread down and horizontally as it soaks into the soil, reaching the entire root zone.
How Much Water Does Each Part of Your Watering System Apply?
Now that you have an idea of how much water your plants need, you need to find out how much water your irrigation system applies.
Measuring drip of bubble output
Drip emitters are typically used around trees and shrubs and are saved in gallons or liters per hour. If you have more than one emitter on a plant (and you often should), total the output of the emitters on each plant. For example, if your tree has three 2 gallon per hour emitters, the output will be 3 emitter x 2 gallons = 6 gallons per hour.
If you don’t know the output of your drip emitters, you can remove an emitter and take it to an irrigation supple or home and garden store or you can estimate emitter output using the diagram below.

Bubblers typically apply 1/2 to 2 gallons per minute. Some allow you to adjust the flow and some do not. The flow rate is often stamped on the top of the bubbler.
Now you’re ready to calculate the total emitter output for your plants. This output will help determine run times for each watering line or valve. It is not necessary to list every plant in your landscape. You can group them by type and size such as 15 foot trees, 6 foot shrubs, our 3 foot groundcovers (sizes refer to the diameter of the plant canopy).
Quick Tip:
When calculating how much water, keep in mind there is a huge difference between the output of a drip emitter and a bubbler or garden hose. Compare how long it would take to apply 10 gallons of water through these methods.
2 MINUTES with watering hose
10 MINUTES with a 1-gallon per minute bubbler
600 MINUTES OR 10 HOURS with a 1-gallon per hour drip emitter.
As you can see drip systems should use multiple emitters and run for longer periods of time to adequately water the root zones of your plants.
Enter your Measurements and Get a Watering Schedule
Input the measurements from your worksheet to estimate the run time for each area of your landscape.
If you have bubblers that are measured in Gallons per Minute, multiply this number by 60 to get the Gallons per Hour. Example 1 Gallon per Minute equals 60 Gallons per Hour.

Watering Frequency
As water and other factors change, you will need to adjust your watering frequency, not the run time.
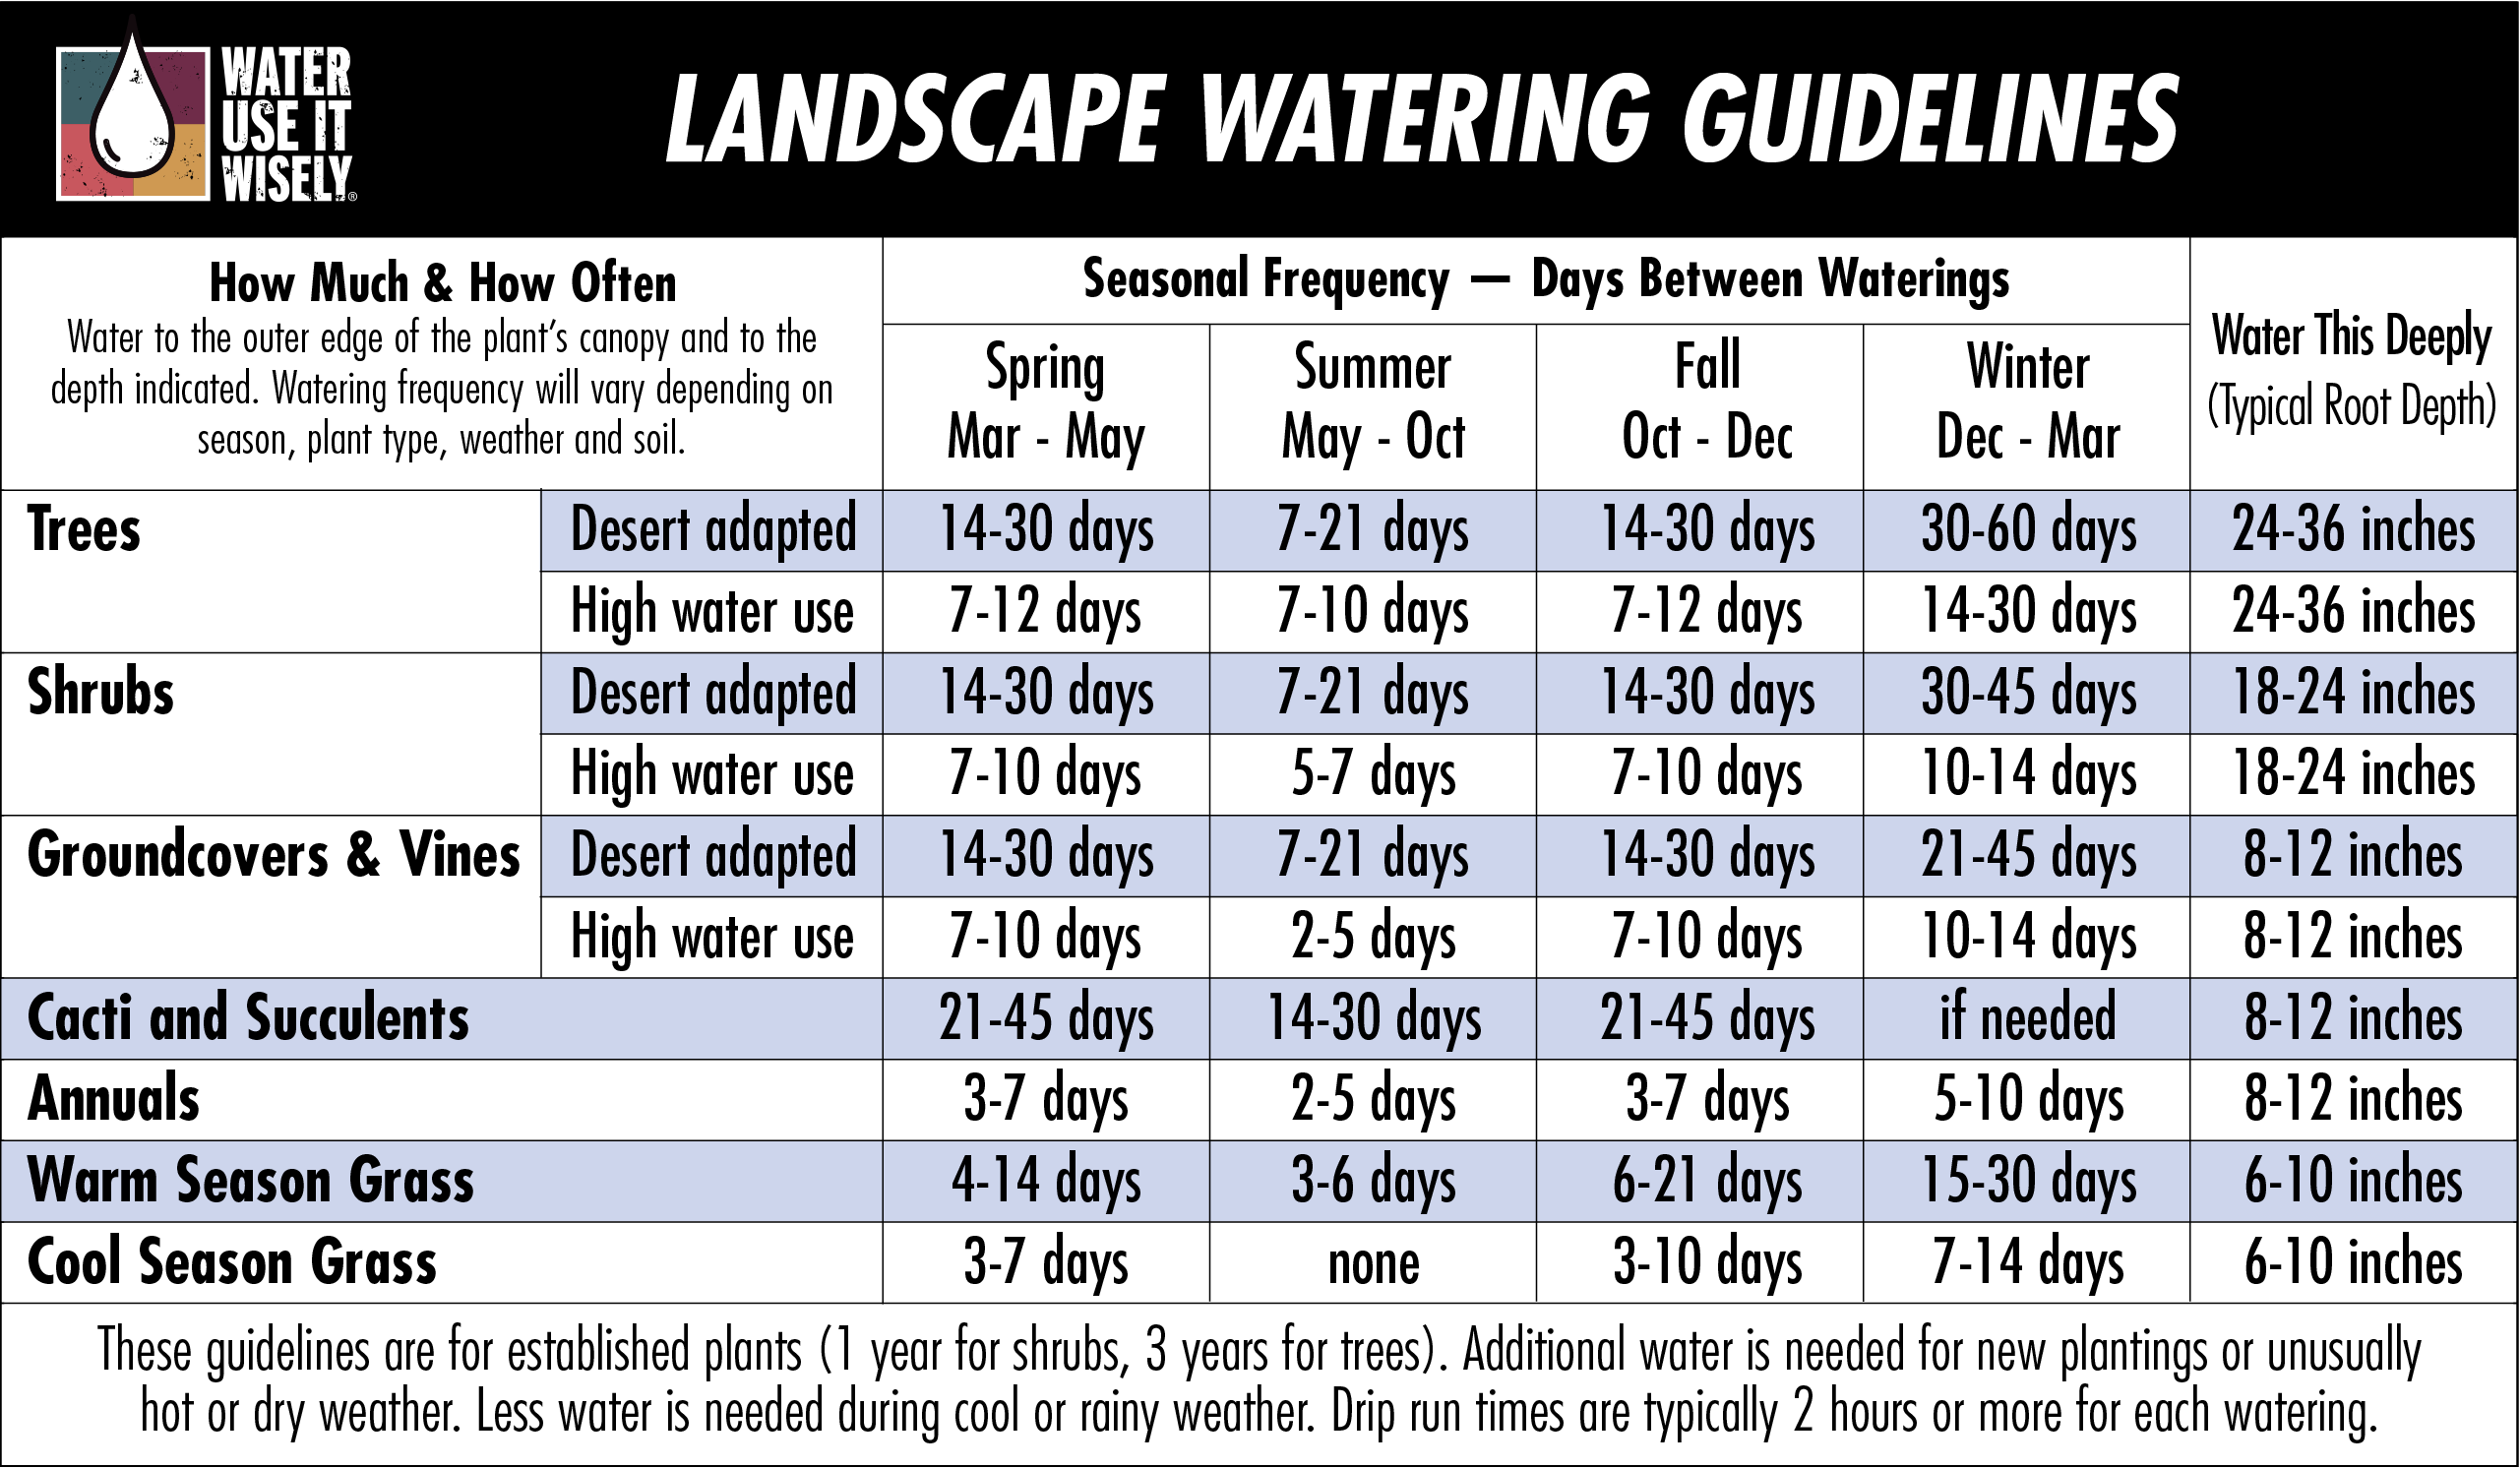
The Landscape Watering Guidelines below is divided into seasons. It is important to adjust your watering schedule at least seasonally, because plants can use 5 to 5 times as much water during the hot, dry summer as they do during winter.
Print the Landscape Watering Guidelines

These guidelines are for established plants (1 year for shrubs, 3 years for trees). Additional water is needed for new plantings or unusually hot or dry weather. Less water is needed during cool or rainy weather. Drip run times are typically 2 hours or more for each watering.
Landscape Plant Watering Tips
Signs of Landscape Plant Overwatering
Signs of Landscape Plant Underwatering
More Tips
Tips & FAQs
-
1-2-3 Rule for Watering Depth
The 1-2-3 Rule is an easy way to remember how deep to water:
- Water small plants such as groundcovers, cacti, and annuals to a depth of 1 foot (water grass to 10 inches).
- Water medium plants such as shrubs to a depth of 2 feet.
- Water large plants such as trees to a depth of 3 feet.

-
Adjusting Watering Frequency for Plant Establishment
The Landscape Watering Guidelines are designed for established plants. On average, the root system of a shrub will be well established after one year, and a tree after three years. New plantings need to be watered more frequently.
-
Adjusting Watering Frequency for Plant Size
A tree has a large root zone, so the soil and roots in a tree’s root zone form a large water storage tank. That means large plants need more water at each watering but can be watered less frequently.
-
Adjusting Watering Frequency for Plant Type
Different plant types (or species) will need different amounts of water to stay healthy. You will notice in the Landscape Watering Guidelines a distinction between desert-adapted and high water-use plants. A desert-adapted plant can go much longer between waterings than a high water-use plant. Low water-use plants can help you save water in your landscape.
High water use
- Citrus
- Hibiscus
- Rose
Desert-adapted
- Palo Verde
- Texas Sage
- Penstemon
-
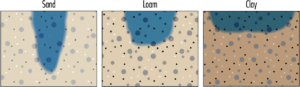
Adjusting Watering Frequency for Soil Type
Soil absorbs and holds water like a sponge. Different types of soil will hold different amounts of moisture. Sandy soil requires less water to wet the root zone. However, that water will not be held by the soil as long. In sandy soil, give plants less water but water more frequently. Clay soil requires more water to wet the root zone, but it will hold the water longer. In clay soil, give plants more water but water less frequently.
-
Alternative Turf Watering Schedule
Efficient sprinkler run times can also be determined using daily climate information from weather stations across the Valley. To use this method, refer to the lawn watering information that is provided on the weather page of the newspaper (see example). You can also access this information on the Arizona Cooperative Extension website, https://cals.arizona.edu/azmet/.
Use your sprinkler number and the lawn watering weather information to determine efficient run times.
Example: The lawn watering information states that 0.6 inches of water needs to be applied to the lawn. The sprinkler number is 0.3 inches. The sprinklers should run for about 30 minutes every 3 days.
-
Can Test (for Measuring Sprinkler Output)
Collect 6 to 8 shallow, flat-bottomed cans like tuna or cat food cans. Spread the cans around your lawn 4 to 5 feet apart, then turn on each valve or station of your sprinklers for 15 minutes. When the sprinklers turn off, measure the depth of water in each can.
Record your numbers on the can test worksheet, then return to this website to calculate your sprinkler number.
On average, pop-up sprinklers apply 0.4 inches of water in 15 minutes, and impact sprinklers apply 0.2 inches of water in 15 minutes. You will typically see some variation in measurement from can to can. However, if you see big differences (greater than.2″), you may need to modify or adjust the sprinkler system to get more uniform and efficient coverage. After you’ve completed any modifications, repeat the can test.
-
Choosing the Best Controller
If you have the opportunity, select a controller that is easy to use. Look for these features:
- Multiple program capability
- Watering intervals of 14 days or greater
- Run time options of 2 hours or greater
- Battery backup feature to maintain your programs and clock during a power outage
- New “smart” controllers have built-in sensors to automatically adjust watering cycles based on local weather conditions or soil moisture levels. Select a smart controller that will adjust watering intervals.
-
Comparing Emitter, Bubbler, and Hose Output
When calculating how long to water, keep in mind there is a huge difference between the output of a drip emitter and a bubbler or garden hose. Compare how long it would take to apply 10 gallons of water through these methods:
- 2 minutes with a watering hose
- 10 minutes with a 1-gallon per minute bubbler
- 600 minutes or 10 hours with a 1-gallon per hour drip emitter
As you can see, drip systems should use multiple emitters and run for longer periods of time to adequately water the root zones of your plants.
-
Controller Runs Irrigation At Strange Times
Check the program for proper input, but also check that the controller did not revert to the factory default program (commonly 10 minutes each day). This can happen during a power surge or power outage. If the controller has battery backup capabilities, make sure the battery is charged.
-
Drip or Bubbler Maintenance
- Fix and replace clogged or missing emitters.
- Check for water placement around plants.
- Move emitters out to dripline as plants grow.
- Adjust basin sizes for bubblers.
-
Estimating Emitter Flow
Use this visual guide to estimate emitter flow rates in gallons per hour (GPH).
-
Gallons of Water Required to Wet Root Zone
NOTE: The amount of water needed will vary depending on soil type and soil conditions
-
General Watering System Maintenance
Since your irrigation system provides a lifeline to the plants in your landscape, remember to include it in your regular maintenance routine. To water your landscape efficiently, your irrigation system must be working properly. At least twice a year do a thorough check of all parts of your irrigation system.
- Check that the controller program is correct.
- If the controller has battery backup power, replace the battery yearly.
- Operate each station to make sure valves are opening and closing properly.
- Check for leaks. Look for standing water, soggy ground, and eroded soil.
- Open the valve box while the system is running and check for leaks.
-
Germinating Rye Grass
To germinate cool season grass (such as winter rye), apply light, frequent waterings-up to four times a day-during the first seven to ten days. Gradually increase run time and decrease frequency as grass gets established
-
Grass Watering Frequency (Days Between Watering)
Water needs of grass vary significantly during the seasons, so you should adjust your watering schedule every month. Below is a recommended monthly watering schedule based on historical weather information. This table works well for warm season grasses such as Bermuda and cool season grasses such as winter rye.
-
Group Similar Plants on the Same Valve
Because of different watering needs, it is best to place trees and shrubs on separate valves.
-
Harvest Graywater
Graywater (used household water from clothes washers, bathtubs, bathroom sinks, and showers) can be used to water your landscape, saving money and our valuable water. However, you must follow state, county, and city guidelines. For more information, call the Arizona Department of Environmental Quality at 1-800-234-5677
-
Harvest Rainwater
Rainwater is very beneficial for your plants, and it’s free. You can harvest rain by contouring your yard with small berms, channels, or swales to direct water runoff to your plants. Learn more about rainwater harvesting.
-
How Deep Should You Water?
-
How Wide Should You Water?
-
Landscape Watering and Maintenance Calendar
- January – Flush your irrigation system and check the filter.
- February – Move emitters out to the dripline of all trees and shrubs as they grow.
- March – Adjust your controller for spring schedule.
- April – Do a thorough check of your irrigation system. Replace controller backup battery.
- May – Adjust your controller for summer schedule.
- June – Check emitters and sprinklers.
- July – Check your controller settings after every power outage.
- August – Check emitters and sprinklers.
- September – Move emitters out to the dripline of all trees and shrubs as they grow.
- October – Adjust your controller for fall schedule.
- November – Do a thorough check of your irrigation system.
- December – Adjust your controller for winter schedule.
-
Landscape Watering Guidelines
-
Many Established Plants Can Live on Rainfall
Once established (1-3 years), many plants that are desert-adapted can survive on rainfall along with occasional supplemental waterings during extended dry periods.
-
Mark Your Calendar to Check Your Irrigation Regularly
As your landscape plants grow, water needs will change. Mark your calendar to reevaluate your landscape each year to determine if water placement should be changed and if more water should be applied. You can reduce your landscape watering 30 to 50 percent by adjusting your irrigation each season
-
One Valve Won't Stop Watering
This occurs most often when a faulty valve gets stuck in the “on” position. You can confirm this by turning off the power to your controller. If the valve continues to water, it is a problem with the valve. If the valve stops watering, it is likely a controller or program malfunction.
-
Perform Frequent Checks on Your System
Since your irrigation system provides a lifeline to the plants in your landscape, remember to include it in your regular maintenance routine. To water your landscape efficiently, your irrigation system must be working properly. At least twice a year do a thorough check of all parts of your irrigation system.
-
Plants Can Share Water
Your landscape plants can share water. If you have high plant density in your landscape (canopy edges are 2 feet apart or less) you may be able to apply less water per plant.
-
Potted Plants Need More Frequent Water
Potted plants have restricted root systems and less soil compared to plants established in the ground. They will typically need more frequent watering
-
Pull Weeds Frequently
Pull weeds every week so they don’t steal water from your plants.
-
Salt Accumulation
Salt buildup may occur due to the watering and evaporation cycle. Plants may eventually show salt burn symptoms such as leaf yellowing and leaf burn. Leach salts from the soil one to two times each summer by irrigating twice as long as usual. A good soaking summer rain might also leach the salts away.
-
Scheduling with an Irrigation Controller or Automatic Timer
A good irrigation controller that is properly programmed can keep your plants healthy and save a lot of water. However, for efficient watering, you can’t just set it and forget it. Change the watering frequencies as plants become established and as the seasons change.
Use the basic instructions printed inside the controller door to input your programming information. To get started, there are four important pieces of information that need to be entered and maintained:
- Current day and time
- Start times
- Watering days or frequency
- Length of time to water
After inputting the program, double-check your entries to make sure they are correct. You can run a program test by pressing the semiautomatic button if your controller has this option. This will run the program immediately, then not water again until the programmed days and times. Some controllers will also allow you to run a program test by pressing the manual button (check your irrigation controller instruction book).
If you don’t have instructions for your controller, write down the make and model and call a home and garden center or sprinkler supply company for help. Many of the larger controller manufacturers will even talk you through programming over the phone. You might also be able to find instructions for your controller on the Internet.
Tips:
- On each controller program, group the valves or stations that require similar watering frequencies.
- Enter different start times on different programs to avoid overlap.
- Enter only one start time for each program, even when there are multiple valves on the program.
- Multiple start times on a program are useful when germinating grass or to split the watering time to reduce runoff.
-
Signs of Landscape Plant Overwatering
- Leaves turn a lighter shade of green or yellow
- Young shoots are wilted
- Growth is excessive
- Algae and/or mushrooms are on or around plants
-
Signs of Landscape Plant Underwatering
- Older leaves turn yellow or brown and drop
- Leaves are dull, wilted, or drooping
- Leaves curl
- Stems or branches die back
-
Signs of Lawn Overwatering
- Water constantly puddles in areas
- Grass has a musty odor
- Soil is extremely soft and mushy
- Algae or mushrooms are present
-
Signs of Lawn Underwatering
- Bermuda turns bluish-gray
- Grass doesn’t spring back after being stepped on
- It is difficult to push a screwdriver into the soil
- Grass still feels warm in evening after sun is down
-
Skip Watering After Rain
Use the ‘off’ or ‘rain’ setting on your controller to stop the watering cycle without disturbing your programs.
-
Sprinkler Maintenance
- Replace broken or missing sprinkler heads.
- Don’t mix head types on the same system.
- Check that sprinkler heads are flush with the soil surface and straight, not tilted.
- Clear grass and obstructions that block sprinkler spray.
- Adjust sprinkler heads so they don’t spray walls, driveways, or sidewalks.
-
Sprinklers Watering Sidewalk, Driveways, Walls, or the Street
It is very common for sprinklers to get out of adjustment or misdirected. This creates a great deal of water waste and can damage structures and pavement. Check the condition of your sprinkler heads frequently, especially after you’ve mowed.
-
Suggested Number of Drip Emitters
-
Use a Rain Gauge
Place a rain gauge in your yard. If you receive at least 1/2″ of rain you can skip your next irrigation cycle.
-
Use a Soil Probe to Check Watering Depth
A good way to test how deep you have watered is to use a soil probe-a sharpened piece of rebar or a very long screwdriver works well. About an hour after watering, push the probe into the soil. It will slide easily through wet soil but will be difficult or impossible to push through dry soil. Water your plants and lawn until you can easily slide the probe to the recommended depth.
-
Use Fertilizer Sparingly
While fertilizers promote plant growth, they also increase water consumption. Apply the minimum amount of fertilizer needed
-
Use Mulch to Conserve Water
If you place mulch-especially organic mulch such as wood chips or compost-over your plants’ root zones, moisture will stay in the soil longer. Mulches reduce evaporation by covering the soil and keeping the temperature cooler. Keep mulches 2 to 4 inches from plant stems. You can cover organic mulches with granite if you prefer.
-
Water Dry Spots by Hand
Water dry spots by hand instead of running the entire sprinkler system longer.
-
Water Grass Early in the Morning
With sprinklers, water in the early morning-about one to three hours before sunrise. That way more water gets to the roots instead of evaporating due to the sun and wind.
-
Water Runs From Your Yard
If water runs off your yard during the irrigation cycle, then split the watering schedule. Water for half the calculated time and repeat after one hour.
-
Water Squirts From Emitters
Water should not squirt or shoot from your drip emitters. Replace emitters that have blown off the tubing or are not working properly If emitters pop off the tubing frequently, your drip system pressure may be too high. Call a professional landscaper to check your system
-
Water Under a Plant's Dripline
After plants are established, most water-absorbing roots are located near the dripline-which is beneath the outer edge of the plant’s canopy-not close to the trunk or stem. Concentrate your emitters along the dripline of each plant. The water will spread down and horizontally as it soaks into the soil, reaching the entire root zone.
-
Watering Frequency
If you look at the Landscape Watering Guidelines for the spring watering frequency for desert adapted trees, you’ll see that the recommendation is 14 to 30 days. How do you determine if it should be every 14 days, every 30 days, or somewhere in between? Besides the current weather conditions, watering frequency depends on a number of factors:
-
Watering Schedule for Newly Planted Desert-Adapted Plants*
- Weeks 1 & 2: Water every 1-2 days in summer, every 3-4 days fall through spring
- Weeks 3 & 4: Water every 3-4 days in summer, every 6-7 days fall through spring
- Weeks 5 & 6: Water every 4-6 days in summer, every 7-10 days fall through spring
- Weeks 7 & 8: Water every 7 days in summer, every 10-14 days fall through spring
- After week 8: Gradually extend the time between irrigations until plants are established
Note: After the eighth week, move the drip emitters to the outer edge of the root ball.
* High water-use plants will require more frequent irrigations.